Arch Linux installation
- 698 words
- 4 min
Arch Linux installation
Following kubecraft advice to go deeper in my linux knowledge, I did the course about installing Arch Linux. Yet I did it a bit differently using Btrfs (I wanted to learn more about this filesystem) instead of LVM.
It was an opportunity to do tasks manually and not by clicking as for bootloader install. I also learned more about systemd, specifically the systemd-boot module.
After booting the installation medium
After booting the installation medium a bash prompt appears:
Arch Linux 6.15.8-arch1-2 (tty1)

archiso login: root (automatic login)

To install Arch Linux follow the installation guide:
https://wiki.archlinux.org/title/installation_guide

For WiFi, authenticate to the wireless network using the iwctl utility.
For mobile broadband (WWAN) modems, connect with the mmcli utility.
Ethernet, WLAN and WWAN interfaces using DHCP should work automatically.

After connecting to the internet, the installation guide can be accessed
via the convenience script Installation_guide

root@archiso ~#
Internet connection
After plugging the internet cable DHCP has done the job:
ip a
# ...
2: enp4s0: <BROADCAST,MULTICAST,UP,LOWER_UP> mtu 1500 qdisc fq_codel state UP group default qlen 1000
    link/ether 74:56:3c:32:f2:27 brd ff:ff:ff:ff:ff:ff
    altname enx74563c32f227
    inet 192.168.1.26/24 metric 100 brd 192.168.1.255 scope global dynamic enp4s0
       valid_lft 84031sec preferred_lft 84031sec
# ...
I may even have the hostname automatically registered in my router's DNS. Let's try to telnet on port 22:
❯ telnet archiso 22
Trying 2a01:cb19:8304:5900:ecd:c6e6:7962:b749...
Connected to archiso.
Escape character is '^]'.
SSH-2.0-OpenSSH_10.0
Great!!!
Wi-Fi setup
In case I had no ethernet cable I would use my Wi-Fi device. Let's do it with the iwctl utility as prompted. iwctl has autocompletion with tab.
iwctl
NetworkConfigurationEnabled: disabled
StateDirectory: /var/lib/iwd
Version: 3.9
[iwd]#
Get Wi-Fi interface
[iwd]# station list
                   Devices in Station Mode             *
--------------------------------------------------------
  Name           State        Scanning
--------------------------------------------------------
  wlan0          disconnected
Do a scan with a this Wi-Fi interface
[iwd]# station wlan0 scan
List the available networks
[iwd]# station wlan0 get-networks
                   Available networks                  *
--------------------------------------------------------
   Network name              Security          Signal
--------------------------------------------------------
   SSID1                     psk                ****
   SSID2                     psk                ***
   SSID3                     psk                **
Connect to your Network
[iwd]# station wlan0 connect SSID1
Type the network passphrase for SSID1 psk.
Passphrase:
[iwd]# quit
I now have an IP address associated to my WLAN device:
ip a
# ...
3: wlan0: <BROADCAST,MULTICAST,UP,LOWER_UP> mtu 1500 qdisc noqueue state UP group default qlen 1000
    link/ether 08:5a:11:01:83:9f brd ff:ff:ff:ff:ff:ff
    inet 192.168.1.15/24 metric 600 brd 192.168.1.255 scope global dynamic wlan0
Set a root password
passwd
New password:
Retype new password:
passwd: password updated successfully
Connect through ssh
ssh root@archiso
root@archiso's password:
To install Arch Linux follow the installation guide:
https://wiki.archlinux.org/title/Installation_guide

For Wi-Fi, authenticate to the wireless network using the iwctl utility.
For mobile broadband (WWAN) modems, connect with the mmcli utility.
Ethernet, WLAN and WWAN interfaces using DHCP should work automatically.

After connecting to the internet, the installation guide can be accessed
via the convenience script Installation_guide
Yay!
Set timezone
If needed.
Get your timezone using timectl
timectl list-timezones
Then :
timedatectl set-timezone Europe/Paris
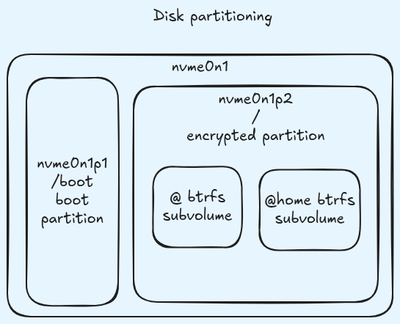
Partitions the disks
Use of Btrfs instead of LVM Modern Arch linux installation guide
Use the fdisk utility:
fdisk /dev/nvme0n1

Welcome to fdisk (util-linux 2.41.1).
Changes will remain in memory only, until you decide to write them.
Be careful before using the write command.


Command (m for help):
Delete existing partitions
Command (m for help): d /dev/nvme0n1
Partition number (1-3, default 3): 1

Partition 1 has been deleted.

Command (m for help): d /dev/nvme0n1
Partition number (2,3, default 3): 3

Partition 3 has been deleted.

Command (m for help): d /dev/nvme0n1
Selected partition 2
Partition 2 has been deleted.
Create new partition table
Command (m for help): g
Create the boot partition
The first partition will be the boot partition. The archlinux wiki advise about a one Gb size for the boot partition. Then we use the default first sector and +1G for the last sector:
Command (m for help): n
Partition number (1-128, default 1):
First sector (2048-1000215182, default 2048):
Last sector, +/-sectors or +/-size{K,M,G,T,P} (2048-1000215182, default 1000214527): +1G

Created a new partition 1 of type 'Linux filesystem' and of size 1 GiB.
We must set it as a UEFI partition type:
Command (m for help): t
Selected partition 1
Partition type or alias (type L to list all): 1
Changed type of partition 'Linux filesystem' to 'EFI System'.
Create the root partition
The second partition will be the root partition. We use the default first sector and the default last sector to use the rest of the disk.
Command (m for help): n
Partition number (2-128, default 2):
First sector (2099200-1000215182, default 2099200):
Last sector, +/-sectors or +/-size{K,M,G,T,P} (2099200-1000215182, default 1000214527):

Created a new partition 2 of type 'Linux filesystem' and of size 475.9 GiB.
We must set it as a Linux x86-64 root partition type:
Command (m for help): t
Partition number (1,2, default 2):
Partition type or alias (type L to list all): 23

Changed type of partition 'Linux filesystem' to 'Linux root (x86-64)'.
Check disk partitioning
Print the partition table:
Command (m for help): p
Disk /dev/nvme0n1: 476.94 GiB, 512110190592 bytes, 1000215216 sectors
Disk model: Samsung SSD 970 PRO 512GB
Units: sectors of 1 * 512 = 512 bytes
Sector size (logical/physical): 512 bytes / 512 bytes
I/O size (minimum/optimal): 512 bytes / 512 bytes
Disklabel type: gpt
Disk identifier: D20FC0C3-0EE1-421A-AF79-9C8DBC780678

Device           Start        End   Sectors   Size Type
/dev/nvme0n1p1    2048    2099199   2097152     1G EFI System
/dev/nvme0n1p2 2099200 1000214527 998115328 475.9G Linux root (x86-64)
All good!
Write the partition table
Command (m for help): w
The partition table has been altered.
Calling ioctl() to re-read partition table.
Syncing disks.
This is confirmed using lsblk:
lsblk
NAME        MAJ:MIN RM   SIZE RO TYPE MOUNTPOINTS
loop0         7:0    0 959.8M  1 loop /run/archiso/airootfs
sda           8:0    1   7.2G  0 disk
├─sda1        8:1    1   1.1G  0 part
└─sda2        8:2    1   180M  0 part
nvme0n1     259:0    0 476.9G  0 disk
├─nvme0n1p1 259:3    0     1G  0 part
└─nvme0n1p2 259:7    0 475.9G  0 part
sda is the usb stick. Our disk nvme0n1 has now two partitions, one has a size of 1Gb and the other has a size of 475.9Gb.
Encrypt the root partition
cryptsetup luksFormat /dev/nvme0n1p2

WARNING!
========
This will overwrite data on /dev/nvme0n1p2 irrevocably.

Are you sure? (Type 'yes' in capital letters): YES
Enter passphrase for /dev/nvme0n1p2:
Verify passphrase:
cryptsetup luksFormat /dev/nvme0n1p2  23.14s user 0.45s system 28% cpu 1:22.19 total
Btrfs setting
Create the Btrfs filesystem
First open the encrypted partition:
cryptsetup open /dev/nvme0n1p2 root
Enter passphrase for /dev/nvme0n1p2:
cryptsetup open /dev/nvme0n1p2 root  6.79s user 0.09s system 59% cpu 11.503 total
Then make the filesystem:
mkfs.btrfs /dev/mapper/root
btrfs-progs v6.15
See https://btrfs.readthedocs.io for more information.

Performing full device TRIM /dev/mapper/root (475.92GiB) ...
NOTE: several default settings have changed in version 5.15, please make sure
      this does not affect your deployments:
      - DUP for metadata (-m dup)
      - enabled no-holes (-O no-holes)
      - enabled free-space-tree (-R free-space-tree)

Label:              (null)
UUID:               5ff605a8-6a34-4821-a367-ca57e1d3660e
Node size:          16384
Sector size:        4096        (CPU page size: 4096)
Filesystem size:    475.92GiB
Block group profiles:
  Data:             single            8.00MiB
  Metadata:         DUP               1.00GiB
  System:           DUP               8.00MiB
SSD detected:       yes
Zoned device:       no
Features:           extref, skinny-metadata, no-holes, free-space-tree
Checksum:           crc32c
Number of devices:  1
Devices:
   ID        SIZE  PATH
    1   475.92GiB  /dev/mapper/root
Create the Btrfs subvolumes
Mount the filesystem on /mnt:
mount /dev/mapper/root /mnt
Then create one /mnt/@ and one /mnt/@home Btrfs subvolumes:
btrfs subvolume create /mnt/@
btrfs subvolume create /mnt/@home
And unmount the partition:
umount /mnt
Mount the partitions
First mount the root subvolume @:
mount -o noatime,compress=zstd,space_cache=v2,discard=async,subvol=@ /dev/mapper/root /mnt
Then create your mount point:
mkdir /mnt/home
And finally mount your @home subvolume:
mount -o noatime,compress=zstd,space_cache=v2,discard=async,subvol=@home /dev/mapper/root /mnt/home
Prepare the boot partition
mkfs.fat -F32 /dev/nvme0n1p1
Create the mount point:
mkdir /mnt/boot
And mount the boot partition:
mount /dev/nvme0n1p1 /mnt/boot
Install base packages
For that use the utility pacstrap:
pacstrap -K /mnt base linux linux-firmware
Set mountpoints permanently
It will be needed at startup of the machine.
genfstab -U /mnt >> /mnt/etc/fstab
And your /etc/fstab file content should be like this:
# Static information about the filesystems.
# See fstab(5) for details.

# <file system> <dir> <type> <options> <dump> <pass>
# /dev/mapper/root
UUID=5ff605a8-6a34-4821-a367-ca57e1d3660e  /      btrfs  rw,noatime,compress=zstd:3,ssd,discard=async,space_cache=v2,subvol=/@ 0 1

# /dev/mapper/root
UUID=5ff605a8-6a34-4821-a367-ca57e1d3660e  /home  btrfs  rw,noatime,compress=zstd:3,ssd,discard=async,space_cache=v2,subvol=/@home 0 2

# /dev/nvme0n1p1
UUID=7466-1B78                             /boot  vfat   rw,relatime,fmask=0022,dmask=0022,codepage=437,iocharset=ascii,shortname=mixed,utf8,errors=remount-ro 0 2
Chroot for simplification
arch-chroot /mnt
Set time zone
ln -sf /usr/share/zoneinfo/Europe/Paris /etc/localtime
Install a text editor
pacman -Syu vim
Set the localization
Select the locales you want to use by editing /etc/locale.gen and uncomment the line en_US.UTF-8 UTF-8 then run:
locale-gen
Also set the LANG variable :
echo "LANG=en_US.UTF-8" > /etc/locale.conf
Install other package
pacman -Syu man-db man-pages texinfo which sudo amd-ucode btrfs-progs
Networking
Enable systemd-networkd
systemctl enable systemd-networkd.service
Enable systemd-resolved
systemctl enable systemd-resolved.service
Configure interface connections
Create a file /etc/systemd/network/25-wireless.network with the following content :
[Match]
Name=wlan0

[Network]
DHCP=Yes
IgnoreCarrierLoss=3s
Install iwd
iwd is used to store Wi-Fi credentials.
pacman -Syu iwd
And enable the service:
systemctl enable iwd.service
Initramfs
Configure your mkinitcpio.conf Hooks by editing /etc/mkinitcpio.conf with this content:
# ...
MODULES=(btrfs)
# ...
HOOKS=(base systemd autodetect microcode modconf kms keyboard sd-encrypt block filesystems fsck)
# ...
And regenerate your initramfs:
mkinitcpio -P
Install the bootloader
There is currently an issue with systemd version 257 concerning the bootloader install, it should be made out of the arch-chroot. First exit the arch-chroot:
exit
The prompt should have changed. Now install the bootloader:
bootctl --esp-path=/mnt/boot/ install
Go back in the chroot and redo a bootloader install:
arch-chroot /mnt
bootctl install
Edit bootloader parameters through /boot/loader/entries/arch.conf:
title Arch Linux
linux /vmlinuz-linux
initrd /initramfs-linux.img

options rd.luks.name=device-UUID=root root=/dev/mapper/root rootflags=subvol=@ rw
Where device-UUID is the UUID of your encrypted device: /dev/nvme0n1p2
Get it using blkid:
blkid
# ...
/dev/nvme0n1p1: UUID="7466-1B78" BLOCK_SIZE="512" TYPE="vfat" PARTUUID="195b42b6-60f4-4dcd-95b3-c51557c791c6"
/dev/nvme0n1p2: UUID="ccdded73-7c6f-4edf-bda6-8f780be59036" TYPE="crypto_LUKS" PARTUUID="8de3c692-6676-4d5f-a4d1-d2afdd0ccfa8"
/dev/mapper/root: UUID="5ff605a8-6a34-4821-a367-ca57e1d3660e" UUID_SUB="37baa2a8-bc5e-48b6-9209-375c34045678" BLOCK_SIZE="4096" TYPE="btrfs"
Set a password for the root user in the chroot environment
passwd
New password:
Retype new password:
passwd: password updated successfully
Create a first user
useradd zeph
Then set a password for this user:
passwd zeph
New password:
Retype new password:
passwd: password updated successfully
And enable sudo for this user:
usermod -aG wheel zeph
Uncomment the line %wheel ALL=(ALL:ALL) ALL
Reboot
Now you can exit the chroot:
exit
Then umount all your partitions:
umount -R /mnt
And finally reboot:
reboot
Arch Linux is now installed.