Installation d'Arch Linux
- 747 words
- 4 min
Installation d'Arch Linux
En suivant les conseils de kubecraft pour approfondir mes connaissances Linux, j'ai suivi le cours sur l'installation d'Arch Linux. Cependant, je l'ai fait un peu différemment en utilisant Btrfs (je voulais en apprendre plus sur ce système de fichiers) au lieu de LVM.
C'était l'occasion d'effectuer les tâches manuellement et non en cliquant comme pour l'installation du bootloader par exemple. J'ai aussi appris davantage sur systemd, spécifiquement le module systemd-boot.
Après avoir démarré le support d'installation
Après avoir démarré le support d'installation, une invite bash apparaît :
Arch Linux 6.15.8-arch1-2 (tty1)

archiso login: root (automatic login)

To install Arch Linux follow the installation guide:
https://wiki.archlinux.org/title/installation_guide

For WiFi, authenticate to the wireless network using the iwctl utility.
For mobile broadband (WWAN) modems, connect with the mmcli utility.
Ethernet, WLAN and WWAN interfaces using DHCP should work automatically.

After connecting to the internet, the installation guide can be accessed
via the convenience script Installation_guide

root@archiso ~#
Connexion internet
Après avoir branché le câble internet, DHCP a fait le travail :
ip a
# ...
2: enp4s0: <BROADCAST,MULTICAST,UP,LOWER_UP> mtu 1500 qdisc fq_codel state UP group default qlen 1000
    link/ether 74:56:3c:32:f2:27 brd ff:ff:ff:ff:ff:ff
    altname enx74563c32f227
    inet 192.168.1.26/24 metric 100 brd 192.168.1.255 scope global dynamic enp4s0
       valid_lft 84031sec preferred_lft 84031sec
# ...
Je peux même avoir le nom d'hôte automatiquement enregistré dans le DNS de mon routeur. Essayons de faire un telnet sur le port 22 :
❯ telnet archiso 22
Trying 2a01:cb19:8304:5900:ecd:c6e6:7962:b749...
Connected to archiso.
Escape character is '^]'.
SSH-2.0-OpenSSH_10.0
Parfait !
Configuration Wi-Fi
Au cas où je n'aurais pas de câble ethernet, j'utiliserais mon périphérique Wi-Fi. Faisons-le avec l'utilitaire iwctl comme indiqué. iwctl a l'autocomplétion avec tab.
NetworkConfigurationEnabled: disabled
StateDirectory: /var/lib/iwd
Version: 3.9
[iwd]#
Obtenir l'interface Wi-Fi
[iwd]# station list
                   Devices in Station Mode             *
--------------------------------------------------------
  Name           State        Scanning
--------------------------------------------------------
  wlan0          disconnected
Faire un scan avec cette interface Wi-Fi
[iwd]# station wlan0 scan
Lister les réseaux disponibles
[iwd]# station wlan0 get-networks
                   Available networks                  *
--------------------------------------------------------
   Network name              Security          Signal
--------------------------------------------------------
   SSID1                     psk                ****
   SSID2                     psk                ***
   SSID3                     psk                **
Se connecter à votre réseau
[iwd]# station wlan0 connect SSID1
Type the network passphrase for SSID1 psk.
Passphrase:
[iwd]# quit
J'ai maintenant une adresse IP associée à mon périphérique WLAN :
ip a
# ...
3: wlan0: <BROADCAST,MULTICAST,UP,LOWER_UP> mtu 1500 qdisc noqueue state UP group default qlen 1000
    link/ether 08:5a:11:01:83:9f brd ff:ff:ff:ff:ff:ff
    inet 192.168.1.15/24 metric 600 brd 192.168.1.255 scope global dynamic wlan0
Définir un mot de passe root
passwd
New password:
Retype new password:
passwd: password updated successfully
Se connecter via ssh
ssh root@archiso
root@archiso's password:
To install Arch Linux follow the installation guide:
https://wiki.archlinux.org/title/Installation_guide

For Wi-Fi, authenticate to the wireless network using the iwctl utility.
For mobile broadband (WWAN) modems, connect with the mmcli utility.
Ethernet, WLAN and WWAN interfaces using DHCP should work automatically.

After connecting to the internet, the installation guide can be accessed
via the convenience script Installation_guide
Parfait !
Définir le fuseau horaire
Si nécessaire.
Obtenez votre fuseau horaire en utilisant timectl
timectl list-timezones
Puis :
timedatectl set-timezone Europe/Paris
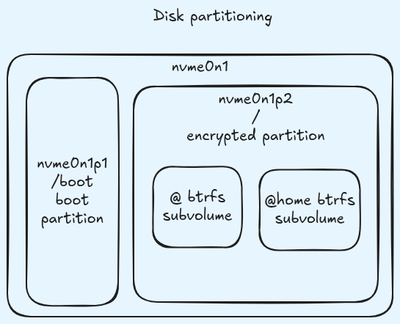
Partitionner les disques
Utilisation de Btrfs au lieu de LVM Guide d'installation moderne d'Arch Linux
Utilisez l'utilitaire fdisk :
fdisk /dev/nvme0n1

Welcome to fdisk (util-linux 2.41.1).
Changes will remain in memory only, until you decide to write them.
Be careful before using the write command.


Command (m for help):
Supprimer les partitions existantes
Command (m for help): d /dev/nvme0n1
Partition number (1-3, default 3): 1

Partition 1 has been deleted.

Command (m for help): d /dev/nvme0n1
Partition number (2,3, default 3): 3

Partition 3 has been deleted.

Command (m for help): d /dev/nvme0n1
Selected partition 2
Partition 2 has been deleted.
Créer une nouvelle table de partition
Command (m for help): g
Créer la partition de boot
La première partition sera la partition de boot. Le wiki d'archlinux conseille une taille de 1 Go pour la partition de boot. Ensuite, nous utilisons le premier secteur par défaut et +1G pour le dernier secteur :
Command (m for help): n
Partition number (1-128, default 1):
First sector (2048-1000215182, default 2048):
Last sector, +/-sectors or +/-size{K,M,G,T,P} (2048-1000215182, default 1000214527): +1G

Created a new partition 1 of type 'Linux filesystem' and of size 1 GiB.
Nous devons la définir comme type de partition UEFI :
Command (m for help): t
Selected partition 1
Partition type or alias (type L to list all): 1
Changed type of partition 'Linux filesystem' to 'EFI System'.
Créer la partition root
La seconde partition sera la partition root. Nous utilisons le premier secteur par défaut et le dernier secteur par défaut pour utiliser le reste du disque.
Command (m for help): n
Partition number (2-128, default 2):
First sector (2099200-1000215182, default 2099200):
Last sector, +/-sectors or +/-size{K,M,G,T,P} (2099200-1000215182, default 1000214527):

Created a new partition 2 of type 'Linux filesystem' and of size 475.9 GiB.
Nous devons la définir comme type de partition Linux x86-64 root:
Command (m for help): t
Partition number (1,2, default 2):
Partition type or alias (type L to list all): 23

Changed type of partition 'Linux filesystem' to 'Linux root (x86-64)'.
Vérifier le partitionnement du disque
Afficher la table de partition :
Command (m for help): p
Disk /dev/nvme0n1: 476.94 GiB, 512110190592 bytes, 1000215216 sectors
Disk model: Samsung SSD 970 PRO 512GB
Units: sectors of 1 * 512 = 512 bytes
Sector size (logical/physical): 512 bytes / 512 bytes
I/O size (minimum/optimal): 512 bytes / 512 bytes
Disklabel type: gpt
Disk identifier: D20FC0C3-0EE1-421A-AF79-9C8DBC780678

Device           Start        End   Sectors   Size Type
/dev/nvme0n1p1    2048    2099199   2097152     1G EFI System
/dev/nvme0n1p2 2099200 1000214527 998115328 475.9G Linux root (x86-64)
Tout va bien !
Écrire la table de partition
Command (m for help): w
The partition table has been altered.
Calling ioctl() to re-read partition table.
Syncing disks.
Ceci est confirmé en utilisant lsblk :
lsblk
NAME        MAJ:MIN RM   SIZE RO TYPE MOUNTPOINTS
loop0         7:0    0 959.8M  1 loop /run/archiso/airootfs
sda           8:0    1   7.2G  0 disk
├─sda1        8:1    1   1.1G  0 part
└─sda2        8:2    1   180M  0 part
nvme0n1     259:0    0 476.9G  0 disk
├─nvme0n1p1 259:3    0     1G  0 part
└─nvme0n1p2 259:7    0 475.9G  0 part
sda est la clé USB. Notre disque nvme0n1 a maintenant deux partitions, une a une taille de 1Go et l'autre a une taille de 475.9Go.
Chiffrer la partition root
cryptsetup luksFormat /dev/nvme0n1p2

WARNING!
========
This will overwrite data on /dev/nvme0n1p2 irrevocably.

Are you sure? (Type 'yes' in capital letters): YES
Enter passphrase for /dev/nvme0n1p2:
Verify passphrase:
cryptsetup luksFormat /dev/nvme0n1p2  23.14s user 0.45s system 28% cpu 1:22.19 total
Configuration Btrfs
Créer le système de fichiers Btrfs
D'abord ouvrir la partition chiffrée :
cryptsetup open /dev/nvme0n1p2 root
Enter passphrase for /dev/nvme0n1p2:
cryptsetup open /dev/nvme0n1p2 root  6.79s user 0.09s system 59% cpu 11.503 total
Ensuite créer le système de fichiers :
mkfs.btrfs /dev/mapper/root
btrfs-progs v6.15
See https://btrfs.readthedocs.io for more information.

Performing full device TRIM /dev/mapper/root (475.92GiB) ...
NOTE: several default settings have changed in version 5.15, please make sure
      this does not affect your deployments:
      - DUP for metadata (-m dup)
      - enabled no-holes (-O no-holes)
      - enabled free-space-tree (-R free-space-tree)

Label:              (null)
UUID:               5ff605a8-6a34-4821-a367-ca57e1d3660e
Node size:          16384
Sector size:        4096        (CPU page size: 4096)
Filesystem size:    475.92GiB
Block group profiles:
  Data:             single            8.00MiB
  Metadata:         DUP               1.00GiB
  System:           DUP               8.00MiB
SSD detected:       yes
Zoned device:       no
Features:           extref, skinny-metadata, no-holes, free-space-tree
Checksum:           crc32c
Number of devices:  1
Devices:
   ID        SIZE  PATH
    1   475.92GiB  /dev/mapper/root
Créer les subvolumes Btrfs
Monter le système de fichiers sur /mnt :
mount /dev/mapper/root /mnt
Ensuite créer un subvolume /mnt/@ et un /mnt/@home Btrfs :
btrfs subvolume create /mnt/@
btrfs subvolume create /mnt/@home
Et démonter la partition :
umount /mnt
Monter les partitions
D'abord monter le subvolume root @ :
mount -o noatime,compress=zstd,space_cache=v2,discard=async,subvol=@ /dev/mapper/root /mnt
Ensuite créer votre point de montage :
mkdir /mnt/home
Et finalement monter votre subvolume @home :
mount -o noatime,compress=zstd,space_cache=v2,discard=async,subvol=@home /dev/mapper/root /mnt/home
Préparer la partition de boot
mkfs.fat -F32 /dev/nvme0n1p1
Créer le point de montage :
mkdir /mnt/boot
Et monter la partition de boot :
mount /dev/nvme0n1p1 /mnt/boot
Installer les paquets de base
Pour cela utiliser l'utilitaire pacstrap :
pacstrap -K /mnt base linux linux-firmware
Configurer les points de montage de manière permanente
Ce sera nécessaire au démarrage de la machine :
genfstab -U /mnt >> /mnt/etc/fstab
Et votre le contenu de votre fichier /etc/fstab devrait être ainsi :
# Static information about the filesystems.
# See fstab(5) for details.

# <file system> <dir> <type> <options> <dump> <pass>
# /dev/mapper/root
UUID=5ff605a8-6a34-4821-a367-ca57e1d3660e  /      btrfs  rw,noatime,compress=zstd:3,ssd,discard=async,space_cache=v2,subvol=/@ 0 1

# /dev/mapper/root
UUID=5ff605a8-6a34-4821-a367-ca57e1d3660e  /home  btrfs  rw,noatime,compress=zstd:3,ssd,discard=async,space_cache=v2,subvol=/@home 0 2

# /dev/nvme0n1p1
UUID=7466-1B78                             /boot  vfat   rw,relatime,fmask=0022,dmask=0022,codepage=437,iocharset=ascii,shortname=mixed,utf8,errors=remount-ro 0 2
Chrooter pour simplifier la suite de l'installation
arch-chroot /mnt
Définir le fuseau horaire
ln -sf /usr/share/zoneinfo/Europe/Paris /etc/localtime
Installer un éditeur de texte
pacman -Syu vim
Définir la localisation
Sélectionner les locales que vous voulez utiliser en éditant le fichier /etc/locale.gen et en décommantant la ligne en_US.UTF-8 UTF-8 et exécuter :
locale-gen
Configurer également la variable LANG :
echo "LANG=en_US.UTF-8" > /etc/locale.conf
Installer d'autres paquets
pacman -Syu man-db man-pages texinfo which sudo amd-ucode btrfs-progs
Réseau
Activer systemd-networkd
systemctl enable systemd-networkd.service
Activer systemd-resolved
systemctl enable systemd-resolved.service
Configurer les connexions d'interface
Créer un fichier /etc/systemd/network/25-wireless.network avec le contenu suivant :
[Match]
Name=wlan0

[Network]
DHCP=Yes
IgnoreCarrierLoss=3s
Installer iwd
pacman -Syu iwd
Et activer le service :
systemctl enable iwd.service
Initramfs
Configurez vos Hooks mkinitcpio.conf en éditant /etc/mkinitcpio.conf avec ce contenu :
# ...
MODULES=(btrfs)
# ...
HOOKS=(base systemd autodetect microcode modconf kms keyboard sd-encrypt block filesystems fsck)
# ...
Et régénérer votre initramfs :
mkinitcpio -P
Installer le bootloader
Il y a actuellement un problème avec systemd version 257 concernant l'installation du bootloader, elle doit être faite en dehors d'arch-chroot. D'abord sortir d'arch-chroot :
exit
L'invite devrait avoir changé. Maintenant installer le bootloader :
bootctl --esp-path=/mnt/boot/ install
Retourner dans le chroot et refaire une installation du bootloader :
arch-chroot /mnt
bootctl install
Éditer les paramètres du bootloader via /boot/loader/entries/arch.conf :
title Arch Linux
linux /vmlinuz-linux
initrd /initramfs-linux.img

options rd.luks.name=device-UUID=root root=/dev/mapper/root rootflags=subvol=@ rw
Où device-UUID est l'UUID de votre périphérique chiffré : /dev/nvme0n1p2
L'obtenir en utilisant blkid :
blkid
# ...
/dev/nvme0n1p1: UUID="7466-1B78" BLOCK_SIZE="512" TYPE="vfat" PARTUUID="195b42b6-60f4-4dcd-95b3-c51557c791c6"
/dev/nvme0n1p2: UUID="ccdded73-7c6f-4edf-bda6-8f780be59036" TYPE="crypto_LUKS" PARTUUID="8de3c692-6676-4d5f-a4d1-d2afdd0ccfa8"
/dev/mapper/root: UUID="5ff605a8-6a34-4821-a367-ca57e1d3660e" UUID_SUB="37baa2a8-bc5e-48b6-9209-375c34045678" BLOCK_SIZE="4096" TYPE="btrfs"
Créer un premier utilisateur
useradd zeph
Mettre en place un mot de passe pour cet utilisateur :
passwd zeph
New password:
Retype new password:
passwd: password updated successfully
Et faire en sorte que cette utilisateur puisse utiliser sudo :
usermod -aG wheel zeph
Puis exécuter la commande visudo et décommenter la ligne %wheel ALL=(ALL:ALL) ALL
Reboot
Maintenant vous pouvez quitter le chroot :
exit
puis démontez toutes les partitions :
umount -R /mnt
Et enfin rebootez :
reboot
Arch Linux est maintenant installé.